As an Amazon Associate, we earn from qualifying purchases. Some links on this site are affiliate links at no extra cost to you. Our recommendations are based on thorough research and editorial judgment.

Angle Measurement: How to Use a Protractor and Bevel Setter for Complex Joinery
Do you ever struggle with getting those tricky angles just right for your projects? Using a protractor and a bevel setter can make a world of difference when tackling complex joinery.
You may be interested


First, you’ll want to line up the protractor’s baseline with one side of your angle. When measuring where the second side meets, it’s smart to check from a couple of different points to minimize errors. Trust me, it can save you a lot of headaches down the road!
For your bevel setter, here’s the trick: adjust the arm to match your desired angle and lock it in. This simple step allows for consistent replication, so you’ll get the same results every time.
Don’t overlook the importance of keeping your tools in good shape; regular maintenance and calibration are essential for keeping everything accurate. Frankly, it’s incredible how much easier things become when your tools are reliable.
The best part is that mastering these tools doesn’t require an engineering degree. With a little practice, you’ll find they become second nature.
So, are you ready to tackle that next joinery project with confidence? A few simple steps can lead you to great results.
Key Takeaways
- Begin by aligning the protractor’s baseline with one side of the angle to ensure accurate measurement for complex joinery cuts.
- Use the sliding bevel setter to replicate angles precisely, locking the blade securely to maintain consistency throughout the project.
- Double-check angles with multiple tools, such as a protractor and Digital Angle Gauge, to prevent measurement errors before making cuts.
- Clean and maintain tools regularly, using a soft cloth and light oil for smooth operation, enhancing the accuracy of your measurements.
- Store tools in a protective case to avoid damage and miscalibration, ensuring they remain functional for future precision tasks.
Master Protractors and Bevel Setters for Perfect Angles

Are you tired of struggling with those tricky angles in your woodworking projects? A protractor and a bevel setter are two tools that can really make a difference in your accuracy.
To get the most out of a protractor, start by lining up the baseline with one side of the angle. This simple step allows you to measure and mark angles up to 180 degrees, making it easier to tackle those complicated joints. Make sure to read the measurement directly above the mark—this helps you avoid any parallax errors that could throw off your work.
When using a bevel setter, it’s super important to adjust the tool to the angle you want. Position it flush against the surface you’re working on before marking. This simple technique will help ensure your cuts are precise, which reduces gaps and enhances the overall fit of your pieces.
Using tools with a strong magnetic base can also stabilize measurements on metal surfaces, allowing for hands-free operation and increased accuracy.
Recommended Products

【Accurate & Reliable】Neoteck Upgraded Angle Finder Features Measuring Range: 4*90°/2*180°, Accuracy: +/- 0.1 Degrees at 0 and 90 Degrees and +/-0.2 Degrees the Remainder. Zero Setting (Relative/Absolute Measurement), Data Holding, Reading Flip and 4 Measurement Units (°, %, In/Ft, Mm/m) for Setting or Checking Relative Angles Between Surfaces, also Working as True Digital Level for Tight Spots
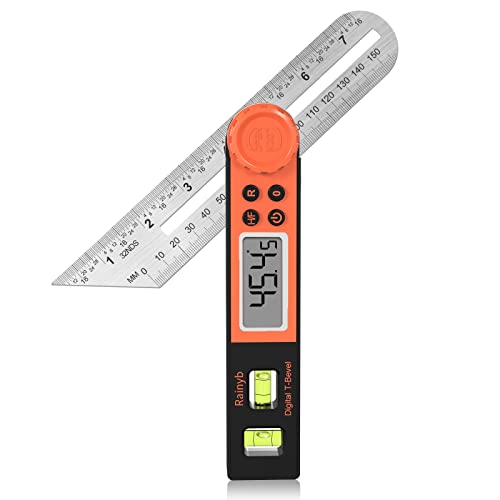
High Accuracy:This digital angle finder allows a full range 0-360°to measure internal angle,external angle & Contra angle Measuring precision is ±0.5°, resolution is 0.05° .You can switch between degrees and minutes to Improve the measurement accuracy , meet your requirements for different accuracy.

RONGPRO 4 IN 1 Woodworking Tools-7''Rafter Square,12''Adjustable Protractor Angle Finder, 10''Framing Square and T-Bevel Gauge,save your time and money
Measuring Angles With a Protractor: a Simple Guide

Measuring angles with a protractor can sometimes feel tricky, but breaking it down step by step makes it manageable. First off, make sure the protractor’s baseline lines up perfectly with one side of your angle. Position the vertex right at the center of the protractor, and you’re already on your way!
Now, here’s the trick: read the measurement where the second side crosses the degree markings. It’s important to avoid parallax errors—those sneaky little mistakes can really throw your measurements off! Most standard protractors measure angles from 0° to 180°. That covers both acute angles (less than 90°) and obtuse angles (more than 90°).
Once you have a reading, give yourself a moment to double-check. It’s worth the time to realign the protractor and ensure everything’s just right. This way, you catch any slight variations that might happen. For enhanced precision, professionals often use tools like high-visibility bubble vials to ensure more accurate angle measurements.
Recommended Products

PROTRACTOR ARM: It's constructed of durable stainless steel and features a 6" adjustable arm for setting the bevel, transferring angles, and finding your measurement. It's an essential tool and gift idea for a fellow carpenter, student, or machinist.
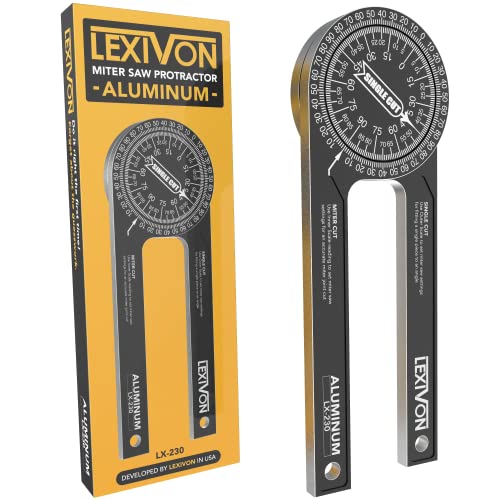
ACCURATE - Crafted from CNC-machined Anodized Aluminum Alloy Steel. Features easy-to-read precision laser engraved scales.

VERSATILE 3-IN-1 DIGITAL ANGLE FINDER: Measure inside and outside angles, lengths, and calculate miter saw cut angles with precision
Using a Sliding Bevel Setter for Accurate Angle Measurement

Have you ever tried to precisely replicate an angle, only to find your measurements a little off? A sliding bevel setter can be a real lifesaver in these situations. This handy tool features an adjustable arm that allows you to match existing angles easily and accurately. When you’ve found the angle you’re after, just lock the blade securely. That way, you can measure without second-guessing.
The beauty of a sliding bevel setter is its ability to transfer angles from templates right onto your new materials, making your work so much smoother. Plus, it significantly reduces the chance of parallax errors because it gives you a clear edge to measure against. So, why does this matter? Well, accuracy in angles can make or break your joinery projects.
Here’s the trick: always double-check your angle with a protractor or a Digital Angle Gauge before you make any cuts. This simple step can save you from wasted material and time. Trust me, taking that extra minute to confirm your work pays off in the end. For even greater precision and ease during your measurements, consider tools with high-contrast laser-etched markings which improve visibility and accuracy.
Recommended Products

【Packaging & Dimension】: 1 x 9 Inch T-Bevel Sliding Angel Gauge, Total Size:370 x 25 x 20mm / 14.5" x 1" x 0.8"(L*W*H). It's a gauge worth your trying.

Prime Material: The T carpentry squares ruler is Made of high quality stainless steel ,which is rust -proof and hard wooden handle, comfortable to operate. The gauge connecting buckle is crafted with copper.

ANGLE MEASURING TOOL: There's no more guesswork when it comes to measuring out your angles and cuts, thanks to our metal ruler. Create your layout on a flat surface, grab your slab of wood, your woodworking partner, and start the construction.
Essential Tips for Precision in Complex Woodworking Joints
Have you ever struggled to get those tricky woodworking joints just right? Precision is everything in woodworking, especially when it comes to complex joints. There are some solid tips you can follow that can really make a difference.
First off, when you’re working on angles, align the protractor’s baseline with one side of the angle. This simple step can save you from those pesky parallax errors. Then, grab a bevel gauge to set and replicate your desired angle before you transfer that measurement to the workpiece. It’s such a lifesaver!
Don’t forget to double-check your angles from different points, particularly with mitered cuts where a little mistake could lead to a big headache. Also, take the time to regularly calibrate your digital angle finder. Trust me, keeping it accurate helps avoid frustration down the line.
The best part is that practicing with scrap materials can unveil any measurement discrepancies before you make your final cuts. This way, you can fine-tune your technique without risking your good wood. Using a bevel gauge with a locking mechanism ensures your angle measurements remain consistent during transfer and cutting.
Avoid These Common Angle Measurement Mistakes
How often do you find yourself hitting a snag in your woodworking projects? One of the biggest culprits is measuring from the wrong reference point. This can lead to all kinds of inaccuracies, resulting in joints that just don’t fit right. Don’t forget to calibrate your angle tools, like protractors and bevel setters, before getting started. If you skip this step, your precision can really take a hit.
Honestly, it’s super easy to overlook double-checking angles with multiple tools. This small oversight can accumulate into some pretty frustrating misalignments. You might think estimating the angles will suffice, but precise measurements are crucial to avoid those annoying gaps that ruin the whole look of your project. Remember, good craftsmanship requires attention to detail.
Here’s the trick: keep your tools stable while measuring. Parallax errors can sneak in, especially with traditional protractors, if you’re not careful. Focus on getting that angle just right every single time—it’s the little things that make a huge difference. Additionally, using tools with an adjustable rubber pressure tip can improve grip and stability during measurements.
Real-World Applications of Angle Measurement Tools
When you dive into woodworking projects, you know that precision is everything. How frustrating is it to cut an angle and find out it doesn’t fit? Using tools like protractors and bevel setters is essential for making sure your cuts are spot on. An angle finder, for example, lets you measure angles accurately, which is a must-have for getting those joints to fit together just right.
Different projects call for different levels of detail. Custom furniture or those intricate architectural designs really benefit from accurate angle measurements. If you’re working on complex joints like dovetails or mortise-and-tenon, a bevel setter can be your best friend, allowing you to easily replicate and transfer angles. This not only saves time but also ensures you’re cutting with precision.
Here’s the trick: when you combine these tools, you minimize measurement errors. This leads to tighter joints, which ultimately enhances the quality of your project. Seriously, the difference in craftsmanship is noticeable. And by mastering protractors and bevel setters, you’ll start to see improvements in both your skills and the durability of your builds. Choosing tools with high accuracy ratings can make a significant difference in achieving precise and reliable measurements.
Recommended Products

[High Accuracy] Measuring angle range: 0-338°,Result accurate to the decimal point and accuracy of ±0.3°.Bevel's ruler is marked with 2 scales, which no need to convert results, meet your requirements for different precisio

【Third Generation Angle Protractor】Combine ruler and digital protractor angle finder, millimeter and inch scale. That makes it easy to measure inside and outside angles.

FLEXIBLE UNIT CONVERSION: Quickly convert between degrees, percent grade, mm/m, and in/ft for various applications like framing, landscaping, and slope finding
Caring for Your Angle Measurement Tools
Have you ever tried measuring angles, only to find your trusty tools acting up? Keeping your angle measurement tools in tip-top shape isn’t just about looking good; it affects how accurate your measurements will be. Regularly cleaning your protractor and bevel setter with a soft cloth is a simple yet effective way to keep them functioning well. It takes just a minute or two to remove dust and debris, giving you a clear view of the markings you depend on.
Storing your tools properly is also crucial. Pop them into a protective case when you’re not using them. This can help prevent accidental drops and keep them from getting miscalibrated. Speaking of calibration, it’s super important to check yours every now and then. Temperature changes can throw off their precision, and you wouldn’t want to end up with wrong measurements just because you skipped that step.
Now, let’s talk about humidity. Extreme levels can lead to rust, especially on any metal parts. So, if you’re in a damp environment, take extra precautions. And don’t overlook the joints on your bevel setter; applying a light oil to those moving parts can keep it operating smoothly for years to come. For added accuracy and ease during projects, consider using digital torpedo levels with auditory feedback features that alert you when target angles are achieved.
Recommended Products

VERSATILE DIGITAL ANGLE GAUGE AND LEVEL: Measure angles, check relative angles with zero calibration feature, or use as a digital level with ease

Digital angle gauge case: Small digital angle finder storage box design for Klein tools 935DAG digital level and angle gauge, also for RDINSCOS/ for Wixey/ for GemRed/ for WIBENTL Mini Digital Level Angle Finder Protractor. The carrying bag for digital angle gauge level is convenient for indoor or outdoor measures and sets angles. Good presents for klein electrician tools are suitable for home storage and travel. External size: 3.15*3.15*1.96 in. Device and accessories are not included.
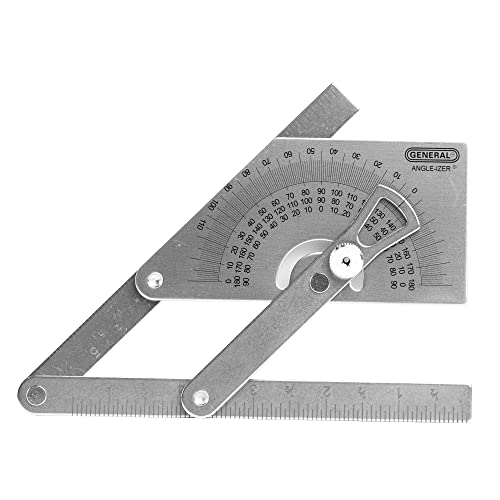
INSIDE, OUTSIDE AND SLOPED ANGLES: This stainless steel protractor/angle finder measures inside, outside and slope angles.
Frequently Asked Questions
How to Measure Angle With a Bevel Protractor?
To measure an angle with a bevel protractor, we align the base, adjust the arm, and guarantee zero’s at the vertex. For accurate woodworking joinery, let’s double-check with another tool afterward for perfect precision.
How to Measure Angle Joinery?
Let’s leverage our angle tools for accurate joinery techniques! We’ll position the protractor, transfer measurements with a bevel setter, and double-check precision measurements using multiple tools. Mastering these steps guarantees flawless fit and finish in our work.
How Do You Properly Use a Protractor to Measure an Angle?
To properly use a protractor, we align its baseline with one side, ensuring proper calibration. We can practice measuring angles and apply comparison techniques for accuracy, checking our results with other tools before cutting.
How to Measure Angle for Bevel Cut?
To measure an angle for a bevel cut, we’ll use bevel cutter techniques and angle cutting tips. Align our protractor, read the measurement, and apply joinery strategies to guarantee precise cuts every time.


